Mouse Embryonic Stem Cell Culture Procedures & Protocols
Introduction
The development of transgenic and gene knockout technology has provided an effective tool for the analysis of gene function. Critical to this has been the ability to isolate and culture murine embryonic stem (ES) cells in vitro. Derived from the inner cell mass of early mouse embryos, ES cells contribute to all tissues including germline tissue. Efficient procedures for the in vitro culture and maintenance of mouse pluripotent ES cells have been crucial to the success of gene targeting experiments. We offer a wide range of mouse ES qualified products providing researchers with convenient and cost effective solutions for the reliable culture of mouse ES cells including ESGRO mLIF supplement, primary mouse embryonic fibroblasts, mouse ES cell lines, stem cell screened FBS and proprietary serum-free media.
The cell culture protocol described here includes the in vitro culture of mouse ES cells in serum-containing media using mouse embryonic fibroblasts and ESGRO mLIF. It should be noted that the protocols included in this manual are intended to serve as a guide only, and optimization of culture protocols is encouraged to ensure success.
Experimental Outline for Targeting ES Cells –Step by Step
Plan out a flow chart from day 1 to day 16–19. Note, depending upon the growth of the ES cells, the days may have to be shifted. Electroporation, screening, picking and preparation of DNA will take 2–3 weeks, including weekends.
Coating Plates with Gelatin Solution
- Warm 0.1% Gelatin Solution to room temperature prior to use.
- In a culture hood, under sterile conditions, add Gelatin Solution to each well of the plate as suggested in the table to the right.
Note: Add enough Gelatin Solution to adequately cover the plasticware surface. - Leave the Gelatin Solution in the wells for at least 30 minutes at room temperature, with dish lids on in the laminar flow hood.
- Remove the Gelatin Solution by aspiration and discard. Immediately add media and cells to the dish. Do not allow the dishes to dry before adding cells.
Plating PMEF Feeder Cells
EmbryoMax® Primary Mouse Embryo Fibroblasts (PMEF) feeder cells are supplied as frozen vials containing 5–6 x 10⁶ cells per vial at passage 3 (2–3 population doublings per passage). It is recommended that PMEF feeder cells be plated one day prior to plating ES cells, which guarantees approximately 95% confluence of the PMEF cells. If ES cells are plated earlier than one day after PMEF plating, there may be some small gaps in the feeder layer. Although plating ES cells when gaps are present may not have any detrimental effects on the ES cells, it is not recommended.
- Prior to thawing PMEF cells, coat plates/flasks with Gelatin solution (Section III).
- Thaw PMEF vial(s) quickly in a 37 °C water bath and transfer to a 15 mL tube (already containing 10 mL of warm PMEF Feeder Cell Medium.
- Gently invert the tube to distribute, and centrifuge at 300xg for 4–5 minutes.
- Remove supernatant and resuspend the cell pellet in warm PMEF Feeder Cell Medium.
- Remove the Gelatin solution from plates/flasks, and aliquot the PMEF feeder cell suspension at the densities recommended in Table 4.1 on the following page.
- Incubate the PMEF Feeder cells at 37 °C with 5% CO2. Use Figures 4A, B and C as a guide for an estimate of correct PMEF density and appearance. Gelatinized plates may be used for 12–14 days.

Figure 4.A) PMEF feeder cells at the correct density B)PMEF feeder cells at too low density C)PMEF feeder cells at too high density
ES Cell Culture using ESGRO® Medium Supplement
ESGRO® supplement is a special formulation of mouse LIF protein. Unlike regular LIF, which is sold by weight, each lot of ESGRO® supplement is sold based on its biological activity. The benefits of ESGRO® mLIF medium supplement include consistent inhibition of mouse ES cell differentiation, no batch-to-batch variation and the increased ability to grow mouse ES cells in feeder-free conditions.
ES Cell Culture without PMEF Feeder Cells
- Thaw a vial containing 1x10⁷ ES cells into 4 mL of ES Cell Medium (containing ESGRO® supplement at 1000 units/mL). Centrifuge (3–5 minutes) and resuspend the cells in 10 mL of ES Cell Medium. Plate the ES cells onto the gelatinized plates at a density of 1–1.5 x 10⁶ cells/25 cm2 (~3 x 10⁶ cells/100 mm plate). Incubate the plates at 37 °C with 5% CO2. The cells appearance should resemble Image 5A.
- Examine the cells daily to determine if a change of media is required (indicated by a change of media color to yellow). After 2–3 days, ES cell cultures will become crowded with large colonies (Image 5B). At this point, passage ES cells at a 1:5 ratio.
- To passage ES cells, prepare two 100 mm gelatinized plates in advance as described (Section III). Remove ES Cell Medium, wash plates twice with DPBS, and add 1.2 mL of Trypsin. Incubate plates at 37 °C for 2 minutes, and then add 10 mL of ES cell medium. Pipette vigorously to break up the ES cell aggregates (avoid bubble formation).
- Add 2 mL of the cell suspension to each gelatinized plate containing 8 mL of ES Cell Medium. Excess ES cells can
- be frozen at a concentration of 2–10 x 106 cells per vial for future use. Please note that ES cells should always be passaged the day before you intend to electroporate.

Figure 5A & B.ES Cell Culture without PMEF Feeder Cells
ES Cell Culture with PMEF Feeder Cells
- Thaw a vial containing 1x10⁷ ES cells into 4 mL of ES Cell Medium (containing ESGRO® supplement at 1000 units/mL). Centrifuge (3–5 minutes) and resuspend the cells in 10 mL of ES Cell Medium.
- Remove the PMEF Feeder Cell Medium from a feeder plate prepared earlier (Section IV), and seed the ES cells onto the PMEF coated plate at a density of 1–1.5 x 10⁶ cells/25 cm2 (~3 x 10⁶ cells/100 mm plate). Incubate the plates at 37 °C with 5% CO2. The cells appearance should resemble Image 5C.
- Examine the cells daily to determine if a change of media is required (indicated by a change of media color to yellow). After 2–3 days, the ES cell cultures will become crowded with large colonies (Image 5D). At this point, passage the ES cells at a 1:5 ratio.
- To passage ES cells, prepare two 100 mm plates containing PMEF cells as previously described (Section 4). Remove the ES Cell Medium, wash plates twice with DPBS, and add 1.2 mL of Trypsin. Incubate at 37 °C for 2 minutes. Add 10 mL of ES Cell Medium and pipette vigorously to disperse the ES cell aggregates (avoid bubble formation).
- Add 2 mL of the cell suspension to each of the PMEF cell plates containing 8 mL of ES Cell Medium. Excess ES cells can be frozen at a concentration of 2–10 x 106 cells per vial for future use. Please note that ES cells should always be passaged the day before you intend to electroporate.

Figure 6.
Electroporation of ES Cells
- The evening before the electroporation is to be performed, prepare 4 plates with PMEF cells (Section IV).
- The morning that the electroporation is to be performed feed the ES cells fresh ES Cell Medium.
- Later that afternoon, harvest the ES cells as described previously, and determine the cell count. 1x10⁷ ES cells is the minimum number of ES cells required for electroporation. If there is excess, freeze the cells down as previously described.
- Centrifuge the cells required for electroporation at 300xg for 10 minutes, then aspirate the medium.
- Resuspend the ES cell pellet in 600 μL of Electroporation Buffer.
- 25–40 μg of knockout construct DNA (purified) should already be linearized, ethanol precipitated and dried as a pellet. In a sterile hood, dissolve the DNA pellet in 30 μL of Electroporation Buffer, and then add the solution to the ES cells. Mix well and leave for 5 minutes at room temperature.
- Place the ES cells in a 0.4 cm electroporation cuvette. Electroporate the suspension at 500 μFD, 0.24 kV. The time constant produced should be between 6.9 and 7.9 milliseconds (optimal 7.2). Following electroporation, place the cuvette on ice for 10 minutes.
- Transfer the electroporated ES cells to 40 mL of ES Cell Medium and mix gently using a Pasteur pipette.
- Plate the ES cell suspension (10 mL per feeder plate, total of 4 plates). Ensure that the PMEF Feeder Cell Medium is removed prior to the addition of cells.
- Incubate for approximately 36 hours at 37 °C and 5% CO2 prior to antibiotic selection.
Selection of ES Cells
Prior to selection, it is recommended that a kill curve should be determined for each ES cell line in order to determine the exact drug concentration to be used. The following selection regimes can be used as a guide:
- Neomycin (G418) in 129SVEV and 129SVJ cells: 350 μg/mL for two days, then 150 μg/mL for the rest of the selection. Total 5–7 days selection
- Neomycin (G418) in C57BL6/J cells: 275 μg/mL for one day, 200 μg/mL for the second day, then 150 μg/mL for the rest of the selection. Total 6–8 days selection
- Hygromycin B in 129SVEV and 129SVJ cells: 100 μg/mL for two days, then 75 μg/mL for one day, then 50 μg/mL for the rest of the selection. Total 7–10 days selection
- To select for transformants, add ES cell medium containing either Neomycin (G418) or Hygromycin B.
- After 48 hours, cell death should be apparent. Change the culture medium daily if there is excessive debris evident or if the medium is discoloring, otherwise every other day is sufficient. If the debris is adhering to the living cells, wash the cells gently with sterile DPBS before changing the medium, taking care not to dislodge the feeder cell layer. ES cells should be cultured for approximately 10 days following electroporation.
Colony Picking
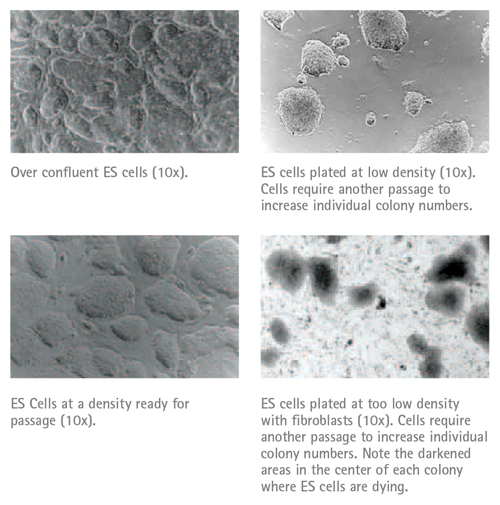
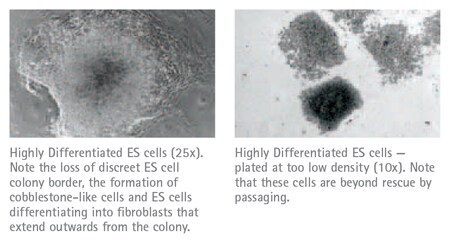
Depending upon the cell line and the media used, ES cell colonies are generally ready for picking 5–10 days after electroporation. The most suitable colonies to select are those that appear rounded or oval in shape, with a phase contrast bright edge and often a dark necrotic center. Differentiated colonies are flat and often surrounded by fibroblast like cells that form cobblestone-like structures. These cells should be avoided when selecting cells. ES cells can be picked onto either gelatinized plates or a PMEF feeder cell layer depending upon the ES cell line used. If gelatinized plates are preferred, please disregard the use of feeder cells as described in the procedure below.
- The day before picking ES cell colonies, coat an appropriate number of 24-well plates with PMEF Cells (SectionIV) or gelatin (Section III).
- Prior to selecting ES cell colonies, ensure that you are wearing gloves, a gown and face mask. All surfaces including the microscope, bench, tip boxes and pipette should be wiped with ethanol prior to use.
- Inspect the ES cell cultures at 4x magnification. Colonies selected for picking should be spaced well enough apart to ensure no contamination from surrounding colonies. When a desired colony is found, circle the colony with a pipette tip to loosen the surrounding fibroblast layer. With the pipette set to a volume of 15 μL, scrape the colony with the pipette tip to dislodge the colony, then aspirate (the colony is often visible inside the tip). Transfer the picked colony to an empty well in a 96-well plate.
- Continue picking and transferring ES cell colonies to fresh wells using a new tip each time, until a suitable number is picked. Clones are often picked in batches of 48 cells to prevent fatigue.
- Add a single drop of Trypsin to each well and incubate at 37 °C for 2 minutes. During this period, replace the PMEF Cell Media in the 24-well plates with 500 μL of ES cell medium.
- 6. Disperse each ES cell colony in the 96-well plate by using a pipette to break up each colony, avoiding excessive foaming. Transfer the suspension to the 24-well plate (including foam) containing 500 μL of ES cell medium, using a fresh tip for each well.
- When all the colonies are transferred, mix each well using a clean pipette tip set to 400 μL. Incubate at 37 °C and 5% CO2. Feed every day with medium supplemented with Neomycin (150 μg/mL) or Hygromycin (50 μg/mL) antibiotics.
- New colonies should be evident within a few days. If the colonies are too close in proximity to each other, disperse them using a 1 mL pipette tip to break up the colonies and spread the cells (Trypsin is not required as colonies break up very easily). Each well should be evenly covered with colonies before harvesting.
- Continue changing the ES cell medium every day until a good coverage of colonies in each well is achieved (typically 7–10 days).
Troubleshooting Guide
The two most common problems encountered when generating knockout mice are (1) ES cell differentiation, and (2) the inability to generate chimeras once a targeted ES cell clone has been established. In Table 25.1 are a number of common causes of ES cell differentiation and recommendations on how to help prevent differentiation from occurring. The extent of ES cell differentiation can be determined by examining the morphology of the ES cell colonies, or more thoroughly assessed using EMD Millipore’s ES Cell Characterization Kit or Alkaline Phosphatase Detection Kit. These kits contain monoclonal antibodies to ES cell markers and reagents for Alkaline Phosphatase detection that permit a discrimination of pluripotent and differentiated ES cells. Also included in Table 25.2 are a number of reasons that often cause the slow growth of ES cells. Table 25.3 contains possible causes for the lack of generating chimeras.