Thawing of Frozen Cell Lines
ECACC Laboratory Handbook
4th Edition

Many cultures obtained from a culture collection, such as ECACC, will arrive frozen and in order to use the cells they must be thawed and put into culture. It is vital to thaw cells correctly in order to maintain the viability of the culture and enable the culture to recover more quickly. Some cryoprotectants, such as DMSO, are toxic above 4 °C. Therefore, it is essential that cultures are thawed quickly and diluted in culture medium to minimize the toxic effects.
Materials
- Cell Culture Media: pre-warmed to the appropriate temperature (refer to the ECACC cell line data sheet for the correct medium and temperature.)
- 70% (v/v) alcohol in sterile water (793213)
- DMSO (D2650)
- Trypan Blue Solution (T8154)
Equipment
- Personal protective equipment (sterile gloves, laboratory coat, safety visor)
- Container to transport frozen ampoules e.g. box of dry ice or liquid nitrogen dewar
- Waterbath set to appropriate temperature
- Microbiological safety cabinet at appropriate containment level
- Incubator
- Pre-labelled flasks
- Inverted phase contrast microscope
- Hemocytometer or automated cell counter like a Scepter™ Cell Counter
- Centrifuge
- Marker Pen
- Pipettes
- Ampoule Rack
- Tissue
Procedure

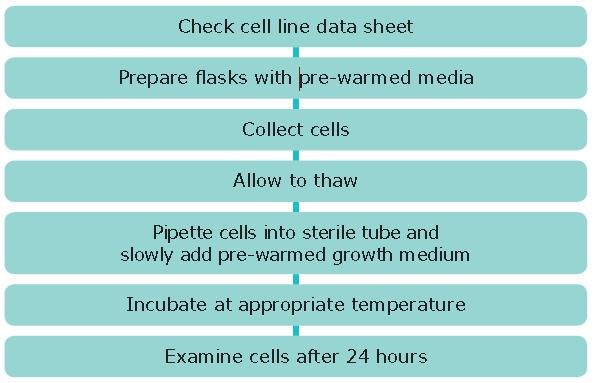
- Read the cell line data sheet to establish specific requirements for your cell line.
- Prepare the flasks: label with cell line name, passage number and date.
- Collect an ampoule of cells from liquid nitrogen storage wearing appropriate personal protective equipment and transfer to the laboratory in a container of liquid nitrogen or on dry ice. It is important to handle the ampoules with care: on rare occasions ampoules may explode on warming due to expansion of trapped residual liquid nitrogen.
- In a microbiological safety cabinet, hold a tissue soaked in 70% alcohol around the cap of the frozen ampoule and turn the cap a quarter turn to release any residual liquid nitrogen that may be trapped. Re-tighten the cap. Quickly transfer the ampoule to a 37 °C water bath until only one or two small ice crystals, if any, remain (1-2 minutes). It is important to thaw rapidly to minimize any damage to the cell membranes.
- Note: Do not totally immerse the ampoule as this may increase the risk of contamination.
- Wipe ampoule with a tissue soaked in 70% alcohol prior to opening.
- Pipette the whole content of the ampoule into a sterile tube (e.g., 15 mL capacity). Then slowly add 5 mL pre-warmed medium that has already been supplemented with the appropriate constituents. Determine the viable cell density using trypan blue. Transfer the appropriate volume of cell suspension to a flask to achieve the cell seeding density recommend on the cell line data sheet.
- For adherent cell lines: Adjust the volume of the medium, and if necessary the flask size, to achieve the cell seeding density recommended on the cell line data sheet. A pre-centrifugation step to remove cryoprotectant is not normally necessary as the first media change will remove residual cryoprotectant. If it is, then this will be specified on the data sheet. If the cells are to be used immediately (e.g. for a cell based assay), rather than subcultured, it may be advisable to perform a pre-centrifugation step to remove cryoprotectant.
- For suspension cell lines: A pre-centrifugation step to remove cryoprotectant is recommended i.e. pellet the cells by centrifugation at 150 x g for 5 minutes and resuspend the cell pellet in fresh medium using the appropriate volume to achieve the correct seeding density.
- Incubate at the temperature and CO2 level recommended on the data sheet. If a CO2 fed incubator is used the flask should have a vented cap to allow gaseous exchange.
- Examine cells microscopically (phase contrast) after 24 hours and sub-culture as necessary.
Key Points
- Most text books recommend washing the thawed cells in media to remove the cryoprotectant. This is only necessary if the cryoprotectant is known to have an adverse effect on the particular cell type. For example, some cell types are known to differentiate in the presence of DMSO. In such cases the cells should be washed in media before being added to their final culture flasks.
- The addition of the thawed cell suspension to culture medium effectively dilutes the cryoprotectant (e.g. DMSO) reducing the toxicity of the cryoprotectant. That is why it is important to add the thawed cell suspension to a larger volume of culture medium immediately after the ampoule has thawed; do not allow thawed ampoules to sit at room temperature for long periods.
- Do not use an incubator or the palm of your hand to thaw cell cultures since the rate of thawing achieved is too slow resulting in a loss of viability. Use a water bath as described in the protocol above.
- If a CO2 incubator is not available gas the flasks for 1-2 minutes with 5% CO2 in 95% air filtered through a 0.2μm filter.
- For most cultures it is best practice to subculture before confluence is reached so that the cells are harvested during their log phase of growth and are at optimum viability ready for seeding into new flasks. Furthermore, there are some specific cell types that must be subcultured before confluence is reached in order to maintain their characteristics e.g. the contact inhibition of NIH3T3 cells is lost if they are allowed to reach confluence repeatedly.
- Some hybridomas may be slow to recover post resuscitation therefore start in 20% (v/v) FBS in the appropriate medium.
Video Tutorial: How to Thaw Cells with High Efficiency
Watch this tutorial to learn best practices to start a fresh cell culture from frozen stocks, cell thawing tips, and tricks to maximize the survival of your cultures.
Sign In To Continue
To continue reading please sign in or create an account.
Don't Have An Account?