Automate HIS TAG® Protein Purification with PureProteome™ Nickel Magnetic Beads on the AAW™ Automated Assay Workstation
Screening expression of recombinant-tagged proteins is a challenging task when analyzing hundreds of newly generated mutants. This protocol is a guide for how to automate lysis, extraction, and purification of HIS-tagged mutants in a high-throughput (96-well) manner. Read the details below.

Intro to Automating HIS TAG® Protein Purification
Our verified automated protocol allows 96 wells of cell paste to be purified using Nickel-HIS binding magnetic beads in 2.5 hours, totally hands free*. The resulting 96 wells of isolated proteins can be further analyzed by any number of methods, including Capillary Electrophoresis (CE), LC-MS, or other high-throughput assays.
PureProteome™ Nickel Magnetic beads are a good choice for automated purification because of their relatively high binding capacity (1-5 µg protein/mL bead suspension) and durable bead type (silica beads). Pairing these beads with a lytic solution such as CelLytic™ B reagent or BugBuster® master mix creates an efficient lysis and capture method eminently suitable for the AAW™ system powered by Opentrons®.
The PureProteome™ user guide protocol has been adapted into Python code, tested, and made available through the Millipore® Protocol Library. Once downloaded to the instrument, it can be used to perform all liquid handling steps including one-step lysis and capture, three washes, and two elution steps, including all on-deck shaking and magnetic pull downs.
*Unless a pause is added at the two elution steps to control for foamy lytic reagents. See below.
Hardware
- AAW™ Automated Assay Workstation (Prod. No. 999-00241)
- AAW™ 8-Channel Pipette, 1,000 μL (Prod. No. 999-00245)
- AAW™ 8-Channel Pipette, 50 μL (Prod. No. 999-00247)
- Opentrons Flex™ Magnetic Block (Prod. No. 999-00204, cone configuration) or Mag Plate Assembly (Prod. No. 90-0003-02, ball configuration)
- AAW™ Flex Gripper (Prod. No. 999-00244)
- Opentrons Flex™ Heater-Shaker (Get a Quote)
- Opentrons Flex™ Deck Expansion (4pk) (Prod. No. 999-00203)
- PureProteome™ Magnetic Stand, 15mL (Prod. No. LSKMAGS15)
Reagents
- PureProteome™ magnetic beads (Prod. No. LSKMAGH)
- BugBuster® Master Mix (Prod. No. 71456) or
- CelLytic™ B Cell Lysis Reagent (Prod. No. B7435), supplemented as per the Product Information Sheet with:
- Wash buffer prepared per the User Guide: 50 mM sodium phosphate, 300 mM NaCl, 10 mM imidazole pH 8.0.
- Elution buffer likewise prepared per the User Guide: 50 mM sodium phosphate, 300 mM NaCl, 300 mM imidazole pH 8.0.
- Frozen cell pellets were created as described in the section below “Considerations Before Starting”.
For those starting work with new line of bacterium, see the section “Considerations Before Starting” at the end of this guide.
PureProteome™ Protocol Uploading and AAW™ Workstation Setup
A new user should read this through entirely before running the protocol. For detailed instructions on loading protocols to your AAW™ workstation, see the AAW™ user manual. But for simplicity, we have included instructions here for guidance.
The AAW™ liquid handler has been programed to automate the isolation of 6His-tagged proteins (refer to the user guide for the PureProteome™ Nickel Magnetic Bead System). To prepare the instrument for this protein purification application, the user can simply follow the on-screen prompts.
- To load a program on your AAW™ workstation, the first run of the program will require the user to download the protocol file from the Millipore® Protocol Library. Next, download the Opentrons® app on your computer. Finally, establish access to your AAW™ workstation either though Wi-Fi or the ethernet cable.
- Once the protocol is downloaded to your computer, you can load your protocol into the Opentrons® App using "Import" (in the upper right corner). From here there are several options to load onto the AAW™ workstation. Either use the menu to the right of the protocol as listed to select “Send to Opentrons FLEX” OR “Start setup.” Conversely you may access by clicking on name “His-tagged Protein Purification by PureProteome™ Nickel Magnetic Beads with Lysis Buffer” in the Protocol list and select the “Start setup” button.
- Once you select your AAW™ device and “Send”, you can either move to the touchscreen (select your loaded protocol and setup as above) or use your computer and begin by choosing Parameters as listed below.
- Dry Run: Yes or No (Default is No). Selecting Yes allows the user to quickly test the protocol without consuming reagents or tips.
- Pause for Centrifuge (Default is No): Pause to consolidate foamy liquids (see “Considerations Before Starting” section below)
- *Columns for CelLytic™ B Reagent (Default is 6): Can be 0-12.
- *Columns for BugBuster® Master Mix (Default is 6): Must add to <12. See note below.
- Magnet Type: Sphere configuration or Cone configuration (Default is Ball)
- P1000_8 channel Mount: Left or Right (Default is Left)
*Note: If 3c +3d is greater than 12 the following error will be returned:
“Protocol analysis failure
An error occurred while attempting to analyze Protein PureProteome on your computer. Fix the following error and try running this protocol again.
Exception [line 123]: Invalid column number”
Once finished with the parameters click “confirm values”.
- Instruments. Clear the robot deck, set up accessories (pipettes and gripper). Follow the on-screen directions and attach the AAW™ 8-Channel Pipette, 1,000 μL and AAW™ 8-Channel Pipette, 50 μL (placed as selected in Step 2b) as well as the AAW™ Flex Gripper, then continue to follow the step-by-step instructions on the touch screen or Opentrons® app. Calibrate both pipettes and the gripper as needed, again following the on-screen prompts (or information in the AAW™ user manual). Successful attachment and calibration will label all three accessories in green. Once complete, back out (< upper left) to the next step.
- Deck Hardware. Install modules and fixtures by loading them into the indicated locations – including Heater-Shaker, trash bin, and both deck extenders - as displayed in on-screen deck locations (and as listed below). Ensure the Heater-Shaker is plugged in, powered on, and visible in app or touch screen modules.
- Heater-Shaker. Remove the deck plate in D3 and install the Heater-Shaker module in its carrier. Ensure the power and USB cables are plugged in and the light comes on when the power button is pressed before lowering the assembly into the deck position and securing the screws. Calibrate as required, per the instrument directions.
- Trash Bin. Remove the deck plate in A3 and secure the (ring) carrier and trash container.
- Staging Area Slots (both). Detach the deck plates at B3 and C3 and replace them with the right-handed deck extenders (keeping the blue labware clip in the upper left corner).
Once complete the monitor should show 2 fixtures and 1 module attached and they should be highlighted in green.
- Labware Position Check. This can be completed after the Labware is placed on the deck (see “8. Labware” section) or one piece at a time. If the protocol has not been recently run, it is likely that a Labware position check will be needed. This allows each labware unit (e.g. reservoirs, plates, magnet units, and pipette boxes) to be exactly located on the deck, using the calibration probe and screen or computer button/commands to move the probe within 0.1 mm of the location. The first run will be a learning experience but follow the on-screen instructions and the AAW™ User Guide.
When complete, select “Update offsets” and “Confirm offsets”. If the Labware position check has been recently accomplished you may wish to accept the previous offsets, simply hit “Confirm offsets” without alteration or check.
- Parameters. Should already be set as per step 3.
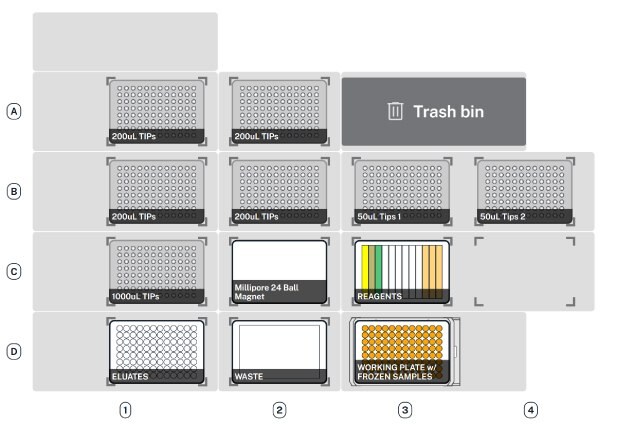
- Labware. All plasticware, pipette tips, and the magnetic unit must be placed on deck. Once complete, the deck should be loaded as shown below. Select “Confirm placements”.
The deck should be set as depicted below in Figure 1.

Figure 1.Deck map configuration for PureProteome™ nickel magnetic bead system. Schematics of the AAW™ deck set-up configuration showing labware and hardware locations.
- Liquids. The touchscreen display will show the required volumes, taking into account the number of plate columns to be used. The reagents needed for this protocol can be prepared according to the PureProteome™ User Guide, briefly outlined below.
- Beads are prepared using the PureProteome™ Magnetic Stand, 15 mL. Beads are mixed using one part slurry to three parts lytic reagents. The required bead slurry volume (1/4 the total bead/lysis reagent volume) was added to a 15 mL tube and washed with an equal volume of elution buffer (described below). After one minute of rotary mixing and then 2 minutes settling on the magnet, supernatant was removed, and an equal volume of lytic reagent (e.g. CelLytic™ or BugBuster® reagent) was added, mixed, and removed with timing as above. Lytic reagent was then added to make the final slurry volume (i.e. 4x added bead slurry) and augmented with lyticase, Benzonase® nuclease, and protease inhibitor cocktail as per the PureProteome™ User Guide.
- Wash buffer can be prepared per the PureProteome™ User Guide: 50 mM sodium phosphate, 300 mM NaCl, 10 mM imidazole pH 8.0.
- Elution buffer can be prepared per the User Guide: 50 mM sodium phosphate, 300 mM NaCl, 300 mM imidazole pH 8.0.
- Frozen cell pellets were created as described in the section “Considerations Before Starting”.
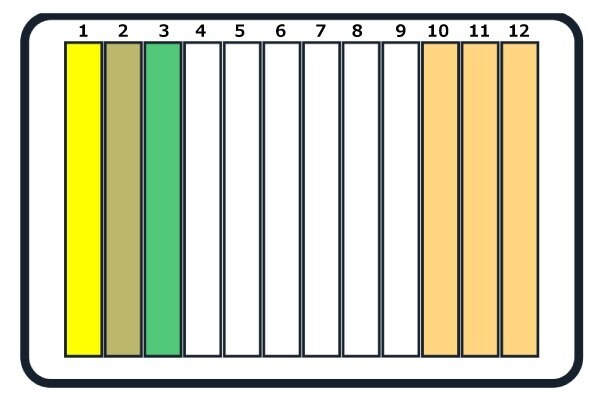
The reagents should be added to the 12-trough reservoir as shown below in Figure 2, placed in deck location C3.

Figure 2.Placement of reagents in the 12-trough reservoir. 1. Bead + lysis buffer (CelLytic™ B reagent), 2. Bead + lysis buffer (BugBuster® mix), 3. Elution buffer, 10. Washer buffer 1, 11. Washer buffer 2, and 12. Washer buffer 3.
Note: A dry run will require only one wash buffer addition, in trough #10.
Necessary reagent volumes will be displayed at this step. Shown below in Table 1 is an example of a 5 CelLytic™ column and a 5 BugBuster® column run.
Once steps 1-9 are complete and you are sure all items are placed for the protocol, close the robotic enclosure and go to the top of the screen to select “Run (>)”.
The AAW™ workstation will add cell lysis and beads, shake for 30 min, remove the unbound fraction, perform three separate washes (add wash buffer, shake, pull down, remove supernatant) and finally perform two elution steps*. The output will be a 96-well plate in position D1 containing the combined eluants (30 μL) for each well, as originally placed in the starting 96-well plate of cell paste.
*Unless a pause is added at the two elution steps to control for foamy lytic reagents. See above.
Some of the resulting purified proteins will be likely to have a small amount of bead carryover. This can be removed by consolidating the beads on a plate magnet and manually pipetting material into a clean plate suitable for downstream analysis.
The purified proteins can now be assayed as desired. The user must be mindful that the high imidazole concentration precludes some common assays. Protein measurement at A280 will have high background, and this will also be the case for many protein assays. Consider Bradford reagent for protein concentration assay (Prod. No. B6916), as it is amenable to high imidazole through dilution. Other methods such as capillary electrophoresis, liquid chromatography, LC/MS, or activity assays are all good candidates for quantitation.
Automated Protein Purification vs Manual Purification Results
This protocol was tested using protein purifications performed according to the PureProteome™ User Guide either manually or using the adapted protocol on the AAWTM workstation, as mentioned above. Assays were repeated 3 times, on different instruments and using different magnetic blocks. All steps of the assay were performed on the instrument deck. Purity and yield for each sample (well) were determined using a Revvity® LabChip GXII Touch™ capillary electrophoresis system.
Note: Revvity® is a registered trademark of Revvity, Inc.
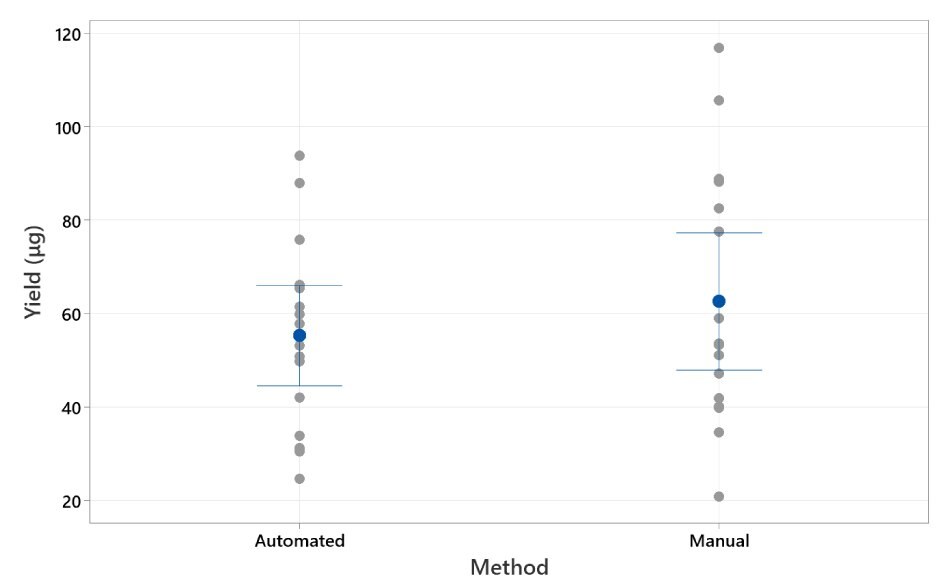
For assessing equivalency of Manual vs AAW™ methods, the Sphere magnet was used. The Manual method yielded a mean of 62.7 μg / well with StDev of 27.4, where the AAW™ method yielded a mean of 55.3 μg / well with StDev of 20.1. These 2 groups are statistically indistinguishable as shown by 2-sample t-test. Results are displayed in Figure 3.

Figure 3. Individual Value Plot of Yield (µg).Individual dot plot displaying yield from Manual and AAW™ automated methods. The whisker range displayed is standard deviation. 95% CI for the mean.
This protocol was developed and tested using eight N-terminal 6His-tagged proteins with the lytic solutions CelLytic™ B reagent (supplemented as recommended) or BugBuster® Master Mix. The key parameter used to compare performance of the various methods tested is protein yield. Six replicates were run for each of the sixteen conditions (protein and lysis solution). The results showed that the AAW™ workstation using the PureProteome™ protein purification protocol afforded reproducible results across the various E. coli constructs. CelLytic™ reagent yields showed %CVs from 7-18.5% across the eight constructs with an average purity of 89%. BugBuster® mix yields varied a bit more, with %CVs ranging from 11-41% and an average purity of 95%. The lytic systems showed protein-dependent differences in proteolysis and yield as determined by capillary electrophoresis on the Revvity® GX II system. See Table 2.
Further work comparing the automated and manual protocols demonstrated that the AAW™ system provided yields and purity that were indistinguishable from an experienced manual user-derived values, within the error of measurement. The experiment was performed using eight samples each of two constructs (samples 3 and 8) on two different AAW™ instruments. The protocol was developed and tested with two types of magnets - a Sphere configuration and Cone configuration. The Cone magnet provided roughly half the yield of the Sphere magnet but the relative yields from the E. coli constructs were maintained, as seen in Table 3. This can be attributed to the greater carrying capacity of the Sphere magnet, allowing fewer beads to be lost throughout the three wash steps.
Summary
This article serves as a guide to automate purifications of HIS TAG® fusion proteins from E. coli expression systems using the PureProteome™ Nickel Magnetic Bead System. It demonstrates both the consistency and reliability that comes with automation using our verified automated protocols.
Request more information on the AAW™ workstation below.
Considerations Before Starting A Run
Before running cell-based protein purification, one must consider the capacity of the process and the information that can be gained from the expected yield of purified protein. For this protocol:
- A standard height 96-well plate, the Axygen V-bottom assay plate, was selected because the well capacity is large (450 µL) and the plate has a V bottom.
- Magnetic beads per well was set by titrating diluted bead slurry amounts, pulling this down with a magnet, and removing excess liquid. Slurry volumes that exceeded the magnet capacity (seen as excessive* beads in waste) or that spilled to the well bottom (blocking liquid removal) were deemed undesirable. For our (Sphere) magnet plate the maximum bead volume amounted to 25 µL PureProteome™ slurry per well. The Opentrons® magnet capacity is roughly half this volume.
- The yields were measured using either a Capillary Electrophoresis system (Revvity® GXII Touch) or by Bradford protein assay. Both require low (2-5 µL) volumes of at least 200 µg/mL protein for a reliable signal; final volumes are 30 µL per well.
*Note, there is almost always some bead loss during any removal of liquid from magnetic bead.
Furthermore, it is important to test your expression system to determine the amount of cells that will saturate the bead and also find whether protein is detectable using the cells from <450 µL of final cell suspension. In this work, BL21-A1, araC (pBAD) expression system worked well as it is inducible and affords high, final culture densities after a long, 18°C final culture. The A600 at harvest for the eight constructs used in testing ranged from 9-12 OD. Testing showed that the maximal recommended bead volume returned >90% recovery using a volume equivalent to give 3.6 OD (e.g. 360 µL of a 10 OD/mL suspension). After spinning the plate with cell suspension at 1xkg for 15 min, the supernatant could be removed with a gentle tap of the inverted plate on a bench covered by a paper towel, leaving ~20 mg of cell paste per well. Careful titration of cell amounts will allow better yield comparisons as the researcher can either normalize the input or correct after purification.
The optimal amount of cell suspension for your protein extraction will vary for your system. Once you have determined the amount of cell culture to use in this process you can create 96-well plates filled with material for processing. Store plates with paste at -80 °C if not using at once.
Finally, a few features have been built into the program that will help if some experimentation is needed.
- The program allows for less than a plate to be run, and the user can choose the number of plate columns to be included (8, 16, 24, 32….96 samples). Changes to number of samples (columns) results in changes to reagent volumes as displayed in the Liquid Reagent section of the setup.
- If lytic methods need to be tested or optimized, the lysis/bead can be split to test two conditions. The user can choose the number of plate columns that can be used to compare one bead/lytic system (e.g. CelLytic™ reagent) to another (e.g. BugBuster® mix).
- Finally, if a foamy lytic solution (e.g. BugBuster® mix) is employed the user can opt to pause after adding elution buffer. Bubbles at this step cause inefficient transfer and high %CVs for replicates. This can be mitigated by spinning before the shaking portion of the elution. The pauses do require the user to intervene in the last quarter of the program’s run time.
To continue reading please sign in or create an account.
Don't Have An Account?