Cellular Fluorescence Imaging with Millicell® Cell Culture Inserts
Section Overview
- Cellular Imaging using Millicell® Cell Culture Inserts
- What do I need for imaging with Millicell® Cell Culture Insert?
- Barrier Formation, Cellular Fluorescence Imaging, and Barrier Assay Sample Protocol
- Sample Results and Data Analysis
Cellular Imaging using Millicell® Cell Culture Inserts
Millicell® cell culture inserts provide a permeable support for cell growth, allowing cells to access media and nutrients from the apical and basolateral sides. This feature more closely promotes an in vivo cellular environment for cells than conventional seeding on polystyrene plates, enabling researchers to perform a wide variety of cellular assays and helping assess many facets of biology.
The optically clear and low pore density polyethylene terephthalate (PET) membrane in Millicell® hanging cell culture inserts allows for cell monitoring during cell growth, ensuring accurate seeding, proliferation, and morphology during experimentation. Clear membrane inserts can also be utilized with various staining tools for bioimaging such as small molecule fluorophores and fluorescent probes, antibody-based techniques, and histological staining.
The clear membrane allows researchers to image cells directly on the insert after staining. This offers a convenient and easier way to perform post-processing and observe cell growth and membrane integrity, specific cellular features, and determine cellular differentiation. Millicell® hanging cell culture inserts also support common quantitative barrier assays such as transepithelial-transepithelial electrical resistance (TEER) measurements and Lucifer Yellow assay in addition to easy visualization.
This article describes how to prepare inserts for fluorescence and immunofluorescence staining and microscopic analysis directly from the insert. We also demonstrate how to utilize imaging to support quantitative barrier measurements.
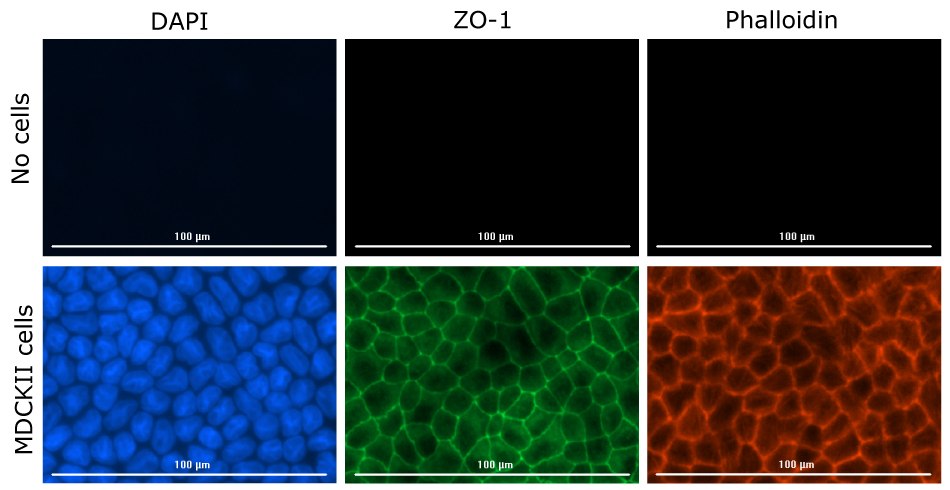
Figure 1.Clear and translucent Millicell® 24-well inserts were seeded with MDCK II cells (control contained no cells), then the membranes were fixed and stained in the insert. Inserts were placed on a 12-well glass plate in PBS and imaged using a fluorescence microscope for nucleus (DAPI, blue), tight junction proteins (ZO-1, green), and actin (phalloidin, red). Clear inserts had better image quality than translucent inserts.
- Greiner CELLSTAR® multiwell culture plates (6-, 12-, and 24 well plates)
- MDCK II cells
- Minimum Essential Medium Eagle
- L-glutamine solution
- Fetal Bovine Serum
- Penicillin-Streptomycin
- Trypsin-EDTA
- Phosphate Buffered Saline
- 4% Formaldehyde
- Triton X-100
- Bovine Serum Albumin Fraction V
- DAPI
- Phalloidin-Atto594
- Anti-ZO-1 Antibody, clone 5G6.1
- Antifade Solution
Barrier Formation, Cellular Fluorescence Imaging, and Barrier Assay Sample Protocol
Barrier Formation
- MDCK II cells were grown in Minimum Essential Medium Eagle (MEM) media supplemented with 10% fetal bovine serum, 1x L-glutamine, and 1x penicillin and streptomycin.
- Passage cells in a T-75 flask when MDCK II cells are 60-80% confluent.
- Aspirate media from the flask and gently wash cells with 10 mL of phosphate buffered saline (PBS) solution, aspirate PBS from flask.
- Add 5 mL of Trypsin-EDTA solution and place in 37°C for 5 minutes to detach cells from flask.
- Add 5 mL of MEM complete media to the flask to inactivate the trypsin.
- Collect the 10 mL cell suspension into a conical tube.
- Spin down cells into a pellet at 300 x g for 3 minutes.
- Resuspend cells in MEM complete media.
- Count cells using the trypan blue exclusion method to calculate the number of live cells. Prepare the respective cell solution with appropriate seeding densities. For this protocol, the seeding densities are 625, 1250, and 2500 MDCK II cells/insert to assess the effect of initial seeding densities on cellular growth and barrier formation.
Seeding, Cell Growth, and Media Exchange
- Place insert in a compatible cell culture plate, ensuring that the flanges are flat and directly resting on the top of the well.
- Add 900 µL of pre-warmed MEM complete cell culture media to basolateral side of the insert. Allow several minutes for the membrane in the insert to become moistened with media.
- Seed 200 µL of MDCK II cell solution into the apical side of the insert.
- Place plate in tissue culture incubator at 37°C, 5% carbon dioxide, and 95% relative humidity.
Note: Do not stack tissue culture plates with inserts in incubator to avoid plate tilting and uneven cell growth.
- Exchange media every 2-3 days to ensure optimal cellular growth.
Note: Use the apical assist rim while performing media exchange to prevent disruption to cell monolayer.
- Observe cell growth on the Millicell® Digital Cell Imager or microscope to monitor cell proliferation and morphology

Figure 2.MDCK II cells grown on Millicell® 1.0 μm clear inserts (PTRP24H48) over 7 days. Cell growth was monitored directly in the insert using the Millicell® Digital Cell Imager. By Day 5, MDCK II cells formed a cobblestone-like morphology indicative of barrier formation.
Fixation, Permeabilization, and Staining
- Rinse inserts twice with PBS solution.
- Fix inserts with 4% paraformaldehyde, adding 200 µL on the apical side and 600 µL on the basolateral side. Incubate inserts at room temperature for 10 minutes.
Note: Different fixative solutions can be used, such as 70% ethanol or 4% formaldehyde. If needed, refer to chemical compatibility of PET membrane. Once the inserts are fixed, they can be stored in PBS at 4°C for later processing.
- Rinse inserts twice with PBS solution.
- Permeabilize inserts with 0.1% Triton X-100, adding 200 µL on the apical side and 600 µL on the basolateral side. Incubate inserts at room temperature for 10 minutes.
- Block inserts in 3% BSA in PBS for 30 minutes at room temperature (this step is optional depending on the staining method).
- Prepare primary antibody ZO-1 56G.1 in 3% BSA in PBS to a final concentration of 7.5 µg/mL. Add primary antibody solution, 200 µL on the apical side and 600 µL on the basolateral side. Incubate inserts in the primary antibody solution overnight at 4°C.
- Rinse inserts twice in PBS solution.
- Incubate insert in respective secondary antibody to a final concentration of 10 µg/mL in 3% BSA in PBS, with 200 µL to apical and 900 µL to basolateral sides. Incubate at room temperature for 15 minutes.
- Rinse inserts twice in PBS solution.
- Prepare 1 µM DAPI and 0.1 µM Phallodin-Atto 594 in PBS solution. Add primary antibody solution, 200 µL on the apical side and 600 µL on the basolateral side. Incubate inserts for 15 minutes.
- Rinse inserts once in PBS.
Fluorescence Imaging
The optically clear membrane in the Millicell® cell culture inserts allows fluorescent imaging of MDCK II cells directly from the cell culture plate. This bypasses the need to excise the membrane from the housing, optimizing the workflow. Below are optimal method(s) to image the insert from the plate.
Image directly from cell culture plate (same well-size)
- Place the insert in the Greiner-Bio CELLSTAR® 24-well plate; ensure flanges are sitting flat on the well plate.
- Aliquot 200 µL of PBS in the apical side and 600 µL of PBS in the basolateral side.
- Perform fluorescence microscopy analysis.
Note: Decreasing the objective working distance can impact the clarity of the imaging. Utilize well plates with shorter well height, which allows the insert and membrane to sit closer to the bottom of the well during imaging. Glass well bottom plates from MatTek can increase the clarity of fluorescence images, notably for images taken at higher objectives.
Image directly from cell culture plate (larger well-size)
- Add 200 µL of PBS in the center of the well of a Greiner-Bio CELLSTAR® 12-well plate or a 12-well glass bottom plate.
- Place the insert directly on top of the PBS, allow the insert to sit directly on the bottom of the well.
- Aliquot 200 µL of PBS in the apical side of the insert.
- Perform fluorescence microscopy analysis.
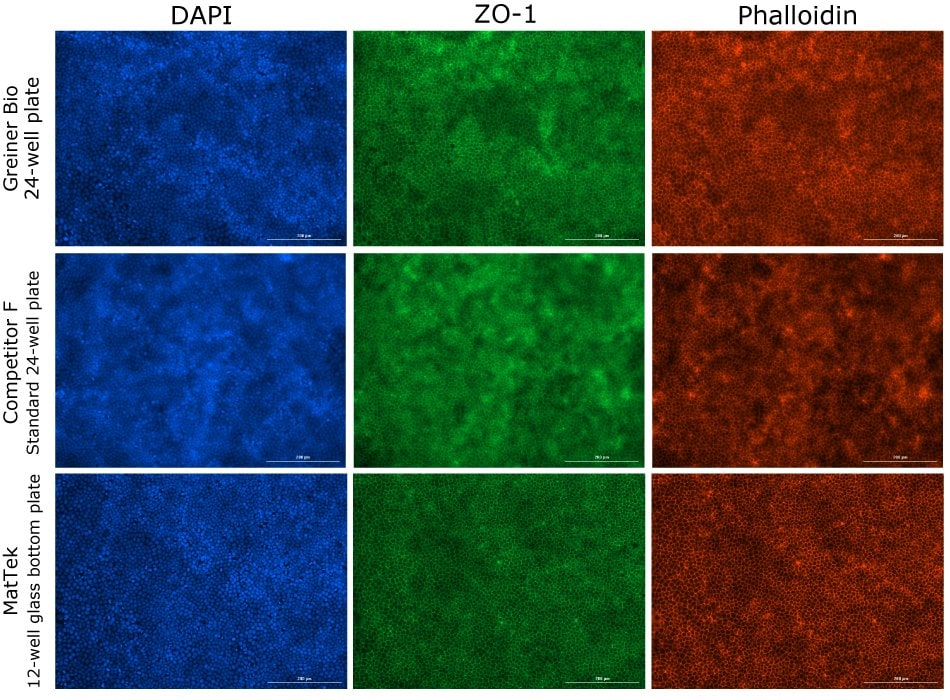
Figure 3.MDCK II cells grown on Millicell® 1.0 μm clear inserts (PTRP24H48). Cells were stained and imaged directly in insert with different cell culture plates. Greiner Bio plates have a short well height, which decreases the objective working distance and increases clarity as compared to competitor standard plates. The MatTek glass well bottom plates increase the clarity of fluorescence images.
Note: If excising the membrane is required, we recommend using a no. 11 scalpel to slowly excise membrane at the outer circular edge of the housing. A no. 13 scalpel can then be used to trim or divide membrane into separate pieces for staining.
Storage and Preservation
- If cellular staining is robust, inserts can be stored with PBS in a 24-well plate.
a. Fill the inserts with PBS, ensuring that the membrane is covered in PBS.
b. Cover the plate to protect from light and store at 4°C for up to one week. - If cellular staining needs to be preserved, inserts can be stored with anti-fade solution in a 12-well plate.
a. Add at least 50 µL of anti-fade to center of the 12-well plate and directly place 24-well insert on top of anti-fade.
b. Add 20 µL of anti-fade to the apical side of the insert.
c. Cover the plate to protect it from light and store at 4°C for up to one week.
Notes:
- Do not use antifade with the mounting media when preserving the membrane in the insert. The mounting media will harden and dry the membrane. Antifade with mounting media is only recommended if membrane will be excised and placed on a glass slide.
- After fixation, inserts can be stored at 4°C.
- Fluorescence intensity and signal will depend on the fluorescent molecule or antibodies used, it is necessary to optimize the concentrations and conditions.
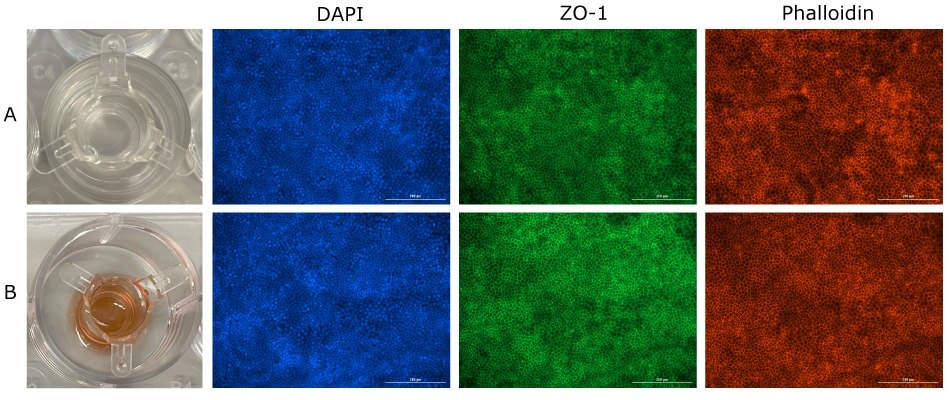
Figure 4.Millicell® inserts can be stored at 4°C under two conditions. After staining, the insert can be stored in (A) a 24-well plate with PBS and (B) in antifade solution. Fluorescence images are taken after one week of respective preservation.
Barrier Assays
Millicell® cell culture inserts provide robust permeable support for cell growth and proliferation and are ideal for common quantitative barrier assessments such as TEER and Lucifer Yellow assays. The clear membrane allows users to easily connect these quantitative measurements with cellular visualization of the barrier.
For more information and sample protocols on barrier formation and permeability assays, visit our technical article page.
Results and Data Analysis
We show that visualization of cellular features using Millicell® 1.0 μm clear inserts supports the quantitative measurements assessed from Lucifer Yellow and TEER assays in a barrier formation assay. We also demonstrate there is no significant difference between Millicell® clear 1.0 µm hanging insert versus competitor clear 1.0 µm hanging insert.
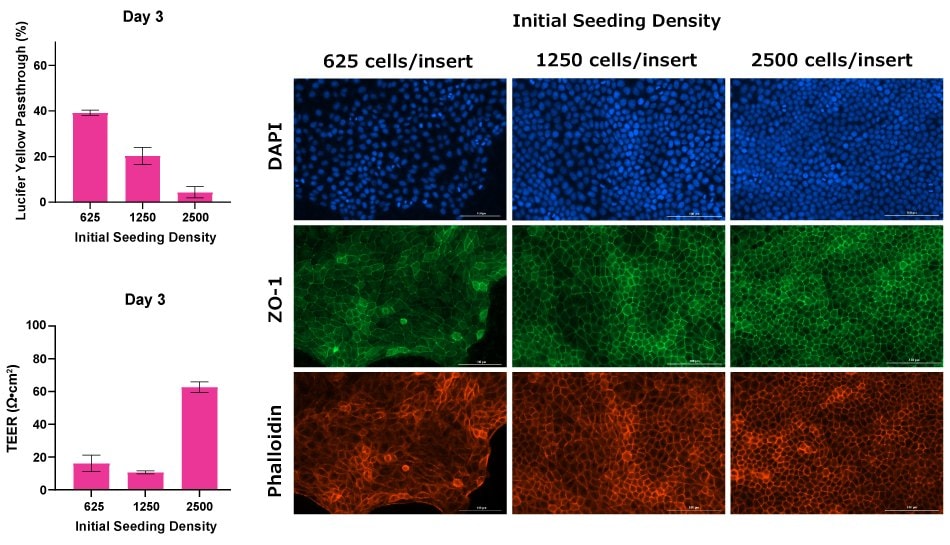
Figure 5.Millicell® 1.0 μm clear inserts (PTRP24H48) were initially seeded with three different densities. On Day 3, barrier permeability and integrity were measured using Lucifer Yellow assay and TEER. Inserts were stained for the tight junction protein ZO-1 to visualize the barrier. The data demonstrate that lower seeding densities have slower barrier formation and better passthrough when compared to the lower TEER values seen at higher seeding densities.
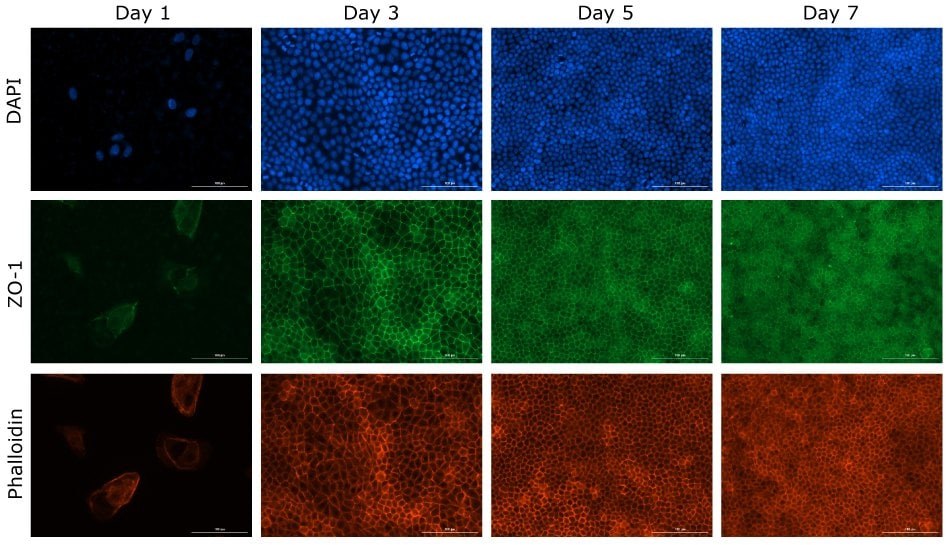
Figure 6.Time course of MDCK II cells (initial seeding: 1250 cells/insert) growing on a clear Millicell® insert (PTRP24H48). Cells were fixed and stained directly in insert for nucleus (DAPI), tight junction proteins (ZO-1), and actin (phalloidin). Inserts were imaged directly in a 12-well glass bottom plate under fluorescence microscope. Qualitative assessment would suggest that barrier integrity and permeability are at peak on Day 5 due to the compact nucleus formation and robust ZO-1 staining.

Figure 7.Barrier permeability assessed by Lucifer Yellow assay. MDCK II cells were grown on clear Millicell® inserts (PTRP24H48) and two competitor (Competitor S and Competitor F) clear 1.0 µm inserts. Inserts were tested on Days 3, 5, and 7. By Day 5, the data demonstrates cells grown on the Millicell® insert form a robust barrier, with <5% LY passthrough, similar to competitor inserts.

Figure 8.Barrier integrity assessed by TEER. MDCK II cells were grown on clear Millicell® inserts (PTRP24H48) and two competitor (Competitor S and Competitor F) clear 1.0 µm inserts. Inserts were tested on Days 3, 5, and 7. By Day 5 the data demonstrates cells grown on the Millicell® inserts form a robust barrier and stabilize by Day 7 (≥50 ꭥ·cm2), similar to competitor inserts.
Recommended Products
Related Products
To continue reading please sign in or create an account.
Don't Have An Account?