How to use Scepter™ 2.0 Cell Counter
The Scepter™ cell counter uses the Coulter principle of impedance-based particle detection to reliably and accurately count every cell in your sample.
- Precise volumes are drawn into the Scepter™ sensor.
- As cells flow through the aperture in the sensor, resistance increases, and, by Ohm’s law (V=IR, where V=voltage, I=current, and R=resistance), this increase in resistance causes a subsequent increase in voltage.
- Voltage changes are recorded as spikes with each passing cell.
- Spikes of the same size are bucketed into a histogram and counted.
- This histogram gives you quantitative data on cell morphology that can be used to evaluate the quality and health of your cell culture.
Step-by-Step Protocol for Scepter™ Cell Counter
Sample Preparation
Start with a single-cell suspension, diluted to a total volume of 100 µL (recommended) in phosphate buffered saline (such as EmbryoMax® 1x DPBS) to 10,000-500,000 cells/mL (operating range) in a 1.5 mL microcentrifuge tube.
Counting Process
Turn on the Scepter™ cytometer by pressing the control button on the back of the instrument and wait for on-screen instructions to appear.
When prompted, attach a sensor to the end of the Scepter™ unit with the electrode sensing panel facing toward the front of the instrument, and you’ll see detailed instructions for each step of the counting process.
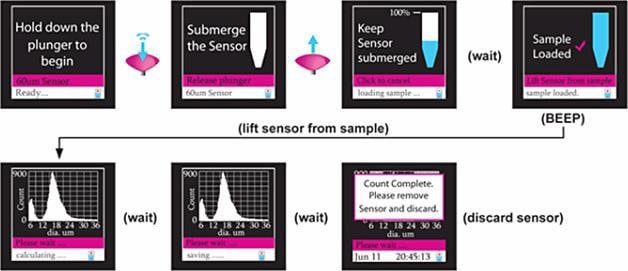
Pipette once to draw sample into the sensor. 50 uL of your cell suspension is drawn into the microfabricated, precision-engineered channel embedded in the sensor. The cell sensing zone detects each cell drawn into the sensor and thus cell concentration is calculated.
The sensing zone also measures cell sizes and cell volumes with sub-micron and sub-picoliter resolution, enabling the Scepter™ cytometer to display a histogram distribution of cell size or cell volume.

Figure 1. Counting Process

Figure 2. Cell Gating Process
Exporting and Manipulating Data
Store up to 72 histograms on the Scepter™ cell counter itself, or upload data to your personal computer using the included software and USB cable. The Scepter™ Application Software shows uploaded volume and size distribution data as shown below. Easily share your data or conduct in-depth analysis by exporting uploaded files to Microsoft Excel.
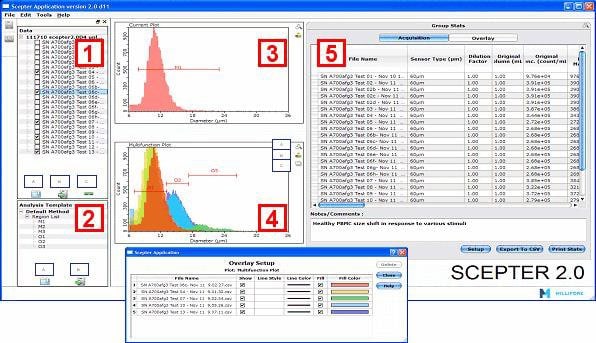
The Scepter™ 2.0 Software Pro User Interface Has 5 Main Components
- Data Panel– Houses all data sets used during an analysis session. Access and display previously stored data as well as files directly uploaded from a connected Scepter™ device.
- Analysis Template Panel– Houses gating and analysis templates that may be applied to multiple data sets.
- Current Plot– displays data from any test run selected in the Data Panel. The user can also use this plot to adjust gating position or add/remove markers. As they change, statistics are instantly updated in the Acquisition table (5).
- Multifunction Plot– Create overlays from multiple data files. Statistics derived from this plot are displayed in the overlay table (5).
- Group Stats Window– composed of two interchangeable displays:
Data from the current plot is displayed by the acquisition table.
Data from the multifunction plot is displayed by the overlay table.

Figure 3. Scepter™ 2.0 Software Pro User Interface
Materials
To continue reading please sign in or create an account.
Don't Have An Account?