Auto2D® Automated 2-D Gel Electrophoresis Device Protocol
Sample Preparation
Application of Reagents
Gel Rehydration
3 Minutes
Sample Loading to Gel
10 Minutes
First Dimension: Isoelectric Focusing
17 Minutes
SDS Equilibration
3 Minutes
Second Dimension: SDS-PAGE
33 Minutes
Detection
Auto2D® Device Reagent Preparation
- Prepare and store Reagent Kits as directed in the literature provided with the kits, or the complete User Guide (online).
- Allow the following products stored at low temperatures to equilibrate to room temperature (20-25 °C approximately 10 minutes).
- IEF Chip
- PAGE Chip
- Rehydration Solution
- DTT Solution
- Ampholyte
- Prepare Working Rehydration Solution for rehydration of IEF Chip and extraction/dilution of protein sample:
*Select ampholyte according to the range of IEF Chip to use. For ampholytes at 40% stock concentration, add 1 μL. For ampholytes at 100X, add 2 μL.
- Prepare Working Equilibration Buffer for equilibration of focused proteins before SDS-PAGE.
Auto2D® Device Sample Preparation
Dissolve the protein sample in the Working Rehydration Solution, prepared according to step 3. Sample may be diluted 2-fold or more with Working Rehydration Solution to reach desired protein concentration and decrease salt concentration.
A high salt concentration can affect protein separation during isoelectric focusing and cause the current to exceed 100 μA. Samples with a high salt concentration should be desalted by either:
- TCA/ acetone precipitation and resuspension of proteins in working rehydration solution
OR - Buffer exchange using a spin column
OR - Desalting protocol using Auto2D® Device (See complete User Guide online, for more information.)
Note: During protein resuspension, avoid heating proteins over 37 °C.
Quantify proteins. Between 0.1 - 100 μg of protein can be loaded for 2D electrophoresis. The optimum amount of protein will depend on detection method and sample complexity. The following protein amounts should be used as a starting point, users may need to optimize the loading amount for their particular sample.
- Coomassie® Brilliant Blue staining: 50 μg
- Fluorescent staining: 10 μg
- Silver staining: 5 μg
- Fluorescent pre-labeling: 3 μg
Use the amount of protein loaded into Solution Chip to determine whether to use S, M, or L recipe type for protein separation.
The sample volume applied to the device is 13 - 15 μL. Sample can be diluted with Working Rehydration Solution, as necessary.
Powering on the Auto2D® Device
Select the appropriate power cord (provided with the device) that is compatible with the power outlets in your country. Firmly push the matching end into the back of the Auto2D® Device, and the other end into the power outlet.
The power switch is located next to the AC plug port on the back of the Auto2D® Device. Press the switch up to turn on.
The application will be automatically launched. From the screen, select Auto2D® Plus mode.
Load a Recipe
Choose SETTING > RECIPE. Touch the Recipe Information screen. Recipe select dialog box will appear.
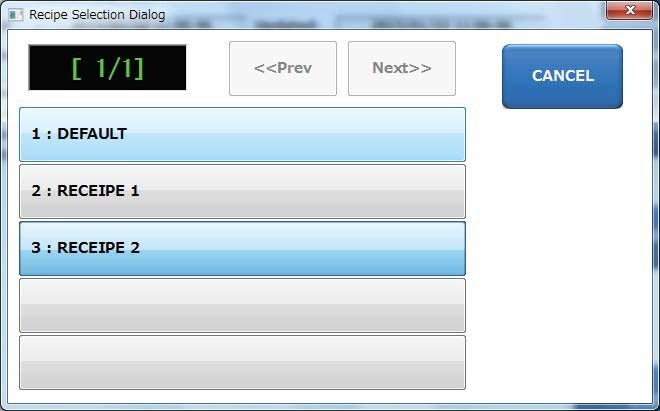
Select “RECIPE NAME” > LOAD > OK > EXIT.
Note: Confirm the desired Recipe name is displayed on the upper right side of the screen.
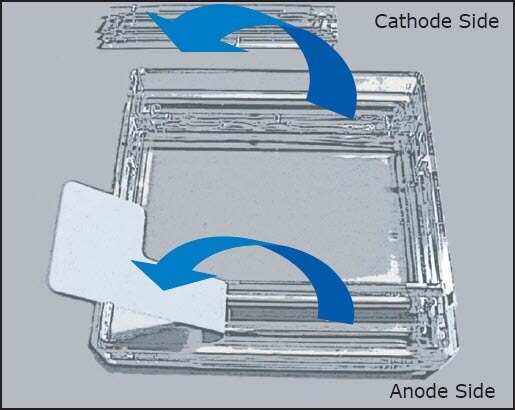
- Remove the white tape on the anode side of the Chip.
- Carefully remove the plastic cover on the cathode side of the Chip.
- Gently rinse anode and cathode buffer wells with distilled water. Using a paper cleaning wipe, carefully wipe any liquid from the top of the Chip making sure not to damage the thin strip of gel located on the Cathode side of the Chip.
Insert the Chips Into the Tray
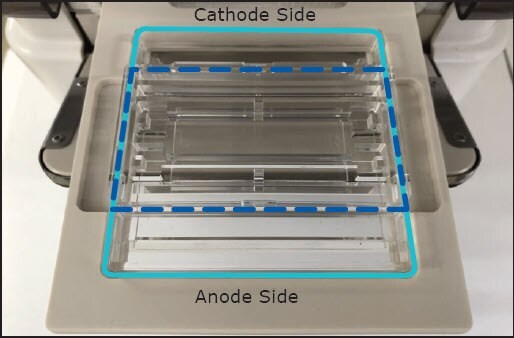
On the Auto2D® Device touch screen, Choose OPEN > OK.
Once tray is open, place the PAGE Chip (light blue line) with the anode side in front. Place the Solution Chip Plus (dark blue lines) on top of the PAGE Chip with the cut-off corners in the front.
Apply the Solutions
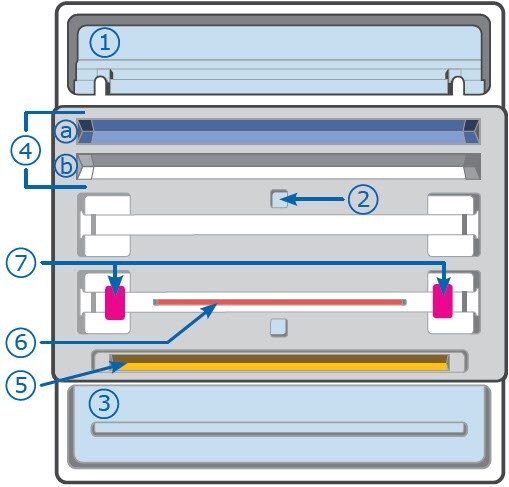
- Cathode Buffer, 4500 μL
- Distilled Water, 4500 μL
- Anode Buffer, 4000 μL
- Working Equilibration Buffer:
- 700 μL
- 700 μL (optional)
- Working Rehydration Solution, 100 μL
- Sample, 13 – 15 μL
- Filter Paper and Water* 5 μL, each
*Wetted filter paper can be used as a wick to trap salt. Using filter paper is recommended to enhance separation of protein samples containing a high salt concentration when using Auto2D® Plus programs and is required when using Auto2D® Desalting program. Filter paper should be 0.2 – 0.3 mm in thickness and cut to a size of 8 mm x 4 mm.
Placement of the Electrode Chip Plus
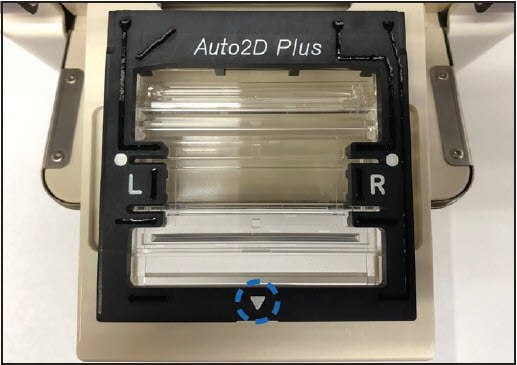
Position the ▼ towards the front.
IEF Chip
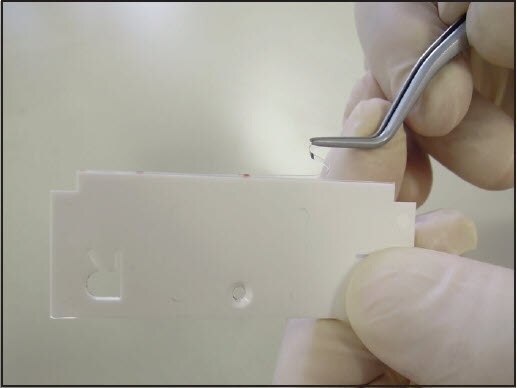
Remove the IEF Chip protective film.
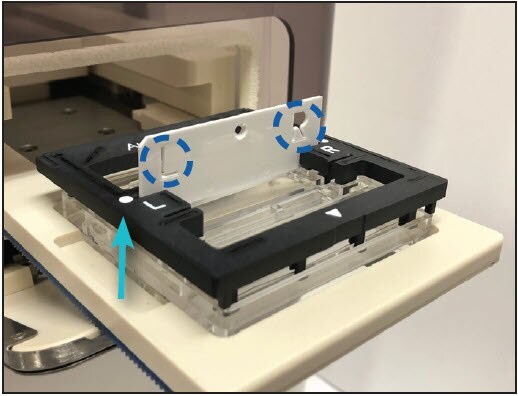
Insert the IEF Chip in the slot indicated by the white dot on the Electrode Chip Plus.
Before the Starting Electrophoresis step, verify the following:
- Electrode Chip Plus is not wet except for anode and cathode chamber.
- The clear cover on the cathode side of the PAGE Chip is removed.
- Solution has been added where required.
Start Electrophoresis
Choose CLOSE > OK > START > OK.
Electrophoresis will begin.
After Electrophoresis
Remove the Gel
Choose OK > OPEN > OK.
- Remove and dispose of the IEF Chip and remaining solutions in the Solution Chip Plus. See Disposal section.
- Remove the PAGE Chip and rinse with distilled water.
- Open the cassette with spatula.
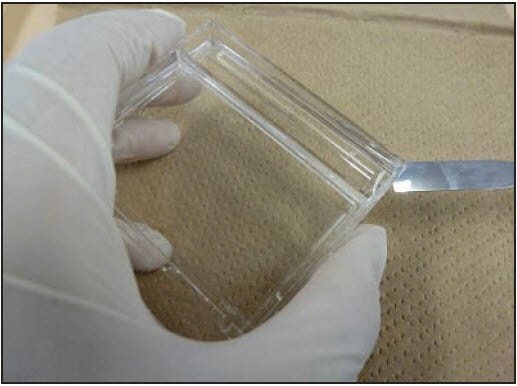
- Mark the orientation of the gel by making a small cut in one of the corners. This will help you to locate the alkaline and acidic sides and high-low molecular weight in your gel (see below).
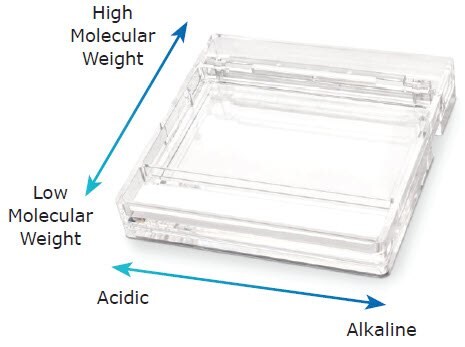
Clean Up
Clean the Electrode Chip Plus with distilled water immediately and let it air dry after use.
Power Off
Choose MENU > EXIT APPLICATION > OK > SYSTEM/OS SHUT DOWN > OK
Turn off switch on the back of the device.
Note: If condensation is observed inside the device, leave the tray open for a while before turning off the power, to allow the inside to dry.
Disposal
Components exposed to samples should be disposed of with biological waste. Other materials should be disposed of according to all applicable international, federal, state, and local regulations. Refer to the components’ Safety Data Sheet for hazard information.
Products
To continue reading please sign in or create an account.
Don't Have An Account?